Live streaming is rapidly becoming an essential feature for modern applications across education, entertainment, and business. Whether you’re hosting live classes, broadcasting sports events, or running webinars, a smooth and interactive streaming experience keeps users engaged.
In this guide, we’ll walk you through building a live streaming app in Flutter using VdoCipher’s user-friendly and flexible infrastructure. You’ll learn how to set up the live stream, integrate DVR features, enable interactive chat, and securely embed DRM-protected content, all while ensuring a seamless multi-platform experience.
Why Choose VdoCipher for Live Streaming?
VdoCipher offers a powerful toolkit for modern day streaming needs. It enables flexible, engaging, and user-friendly live streaming. Thus making it an excellent choice for developers and businesses, from education to entertainment.
1. Integrating DVR for Enhanced Flexibility
DVR (Digital Video Recorder) functionality allows viewers to pause, rewind, and replay content during a live session. Benefits include,
Pause, Rewind, Replay: DVR empowers viewers to control the live stream, making it ideal for educational sessions or long events like webinars and matches.
Catch Up Anytime: Latecomers can rewind and join the stream seamlessly without missing key moments.
Smooth Experience: The DVR buffer (1–2 hours) ensures uninterrupted access to past sections while staying connected to live content.
2. Enabling Interactive Live Chat
Real-time chat enhances user engagement by allowing Q&A sessions, polls, and discussions. Chat features,
Real-Time Interaction: Engage your audience with live Q&A, polls, and discussions during streams.
Anonymous Contributions: Viewers can share questions or opinions without revealing their identity.
Zenstream live can help you stream your content live to your users. You can also engage with your audience with the chat feature.
QuickStart: Building a Low-Latency Flutter Live Stream App
In this tutorial, we’ll quickly build a low-latency in-app live streaming experience.
You will learn how to:
- Setting up a live stream from VdoCipher’s dashboard.
- Streaming from the OBS software application (or similar tools).
- Streaming live videos in a Flutter application using VdoCipher.
Step1: Set Up a Live Stream on VdoCipher’s Dashboard
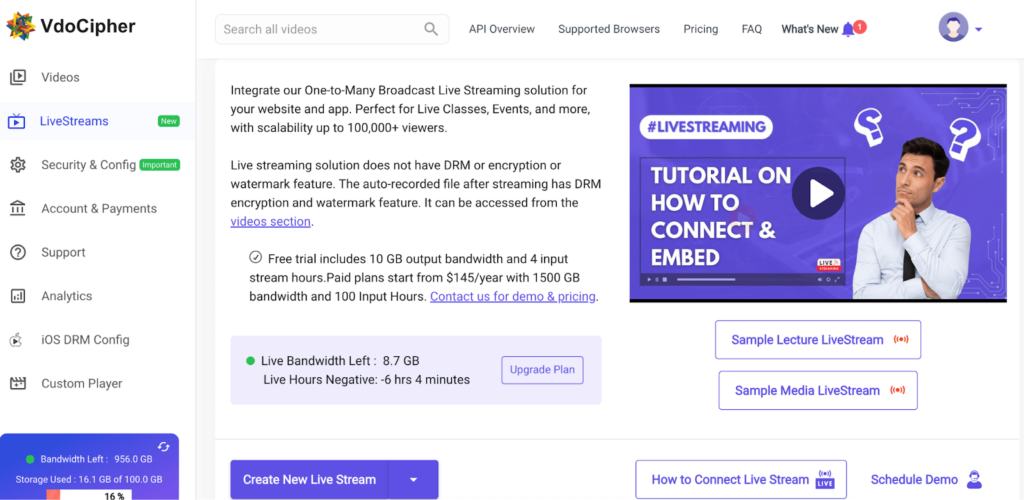
Open the Live Stream section from the left menu in the VdoCipher dashboard and set up a live stream by pressing Create New Live Stream.
Note: You can also schedule the live stream for later.
Now enter a title for your live stream for reference and choose preferred chat mode then press the create button to generate streaming credentials for your live stream. Generating stream credentials, this might take up to 90 sec.
Different chat modes and their meaning:
- Anonymous/Non-authenticated Chat: Allow anyone to join in the chats and set their own name
- Authenticated Chat: Allow only viewers who have generated the tokens via logging into your platform, you can keep the same user name as on your platform.
- Off : There will be no Chat Option.
Step 2: Streaming from OBS Studio
Once streaming credentials are generated now you can use these credentials to start a video stream from an OBS Studio or any popular streaming software or Zoom.
Follow these steps to step up OBS Studio for streaming:
1. Install OBS Studio: Download and install OBS Studio (or your preferred streaming software).
2. Configure OBS Settings:
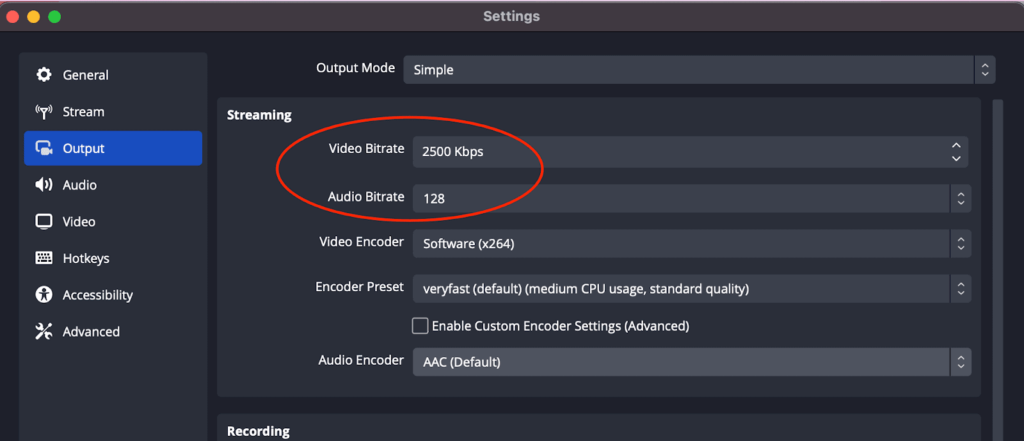
Click on the “Settings” button, and then go to the “Output” section. Some settings will look different on Mac vs Windows. But key settings are the same in both systems.
a) Video Bitrate: Choose 2500 kbps for lectures/webinars/course content. If you have other forms of content like events/sports/movies, then you can also choose higher bitrates up to 7000 kbps. But 2500 kbps should be quite good for lecture content, and we recommend it.
b) Audio Bitrate: Set it to 128 kbps.
Please keep the encoder preset and other settings to default settings. Setting → Output.
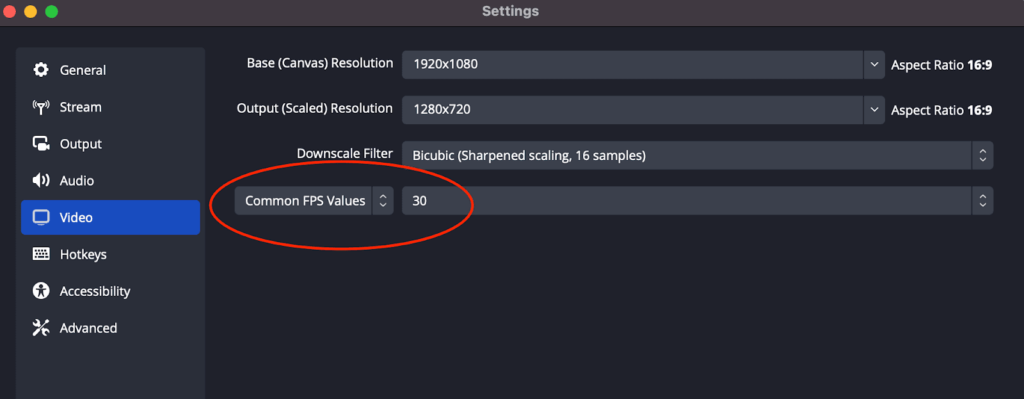
c) Frame Rate & Resolution: Go to the “Video” section and ensure that “Common FPS Values” is 30. You can use 720p or 1080p resolution as needed.
3. Server URL & Stream Key: Copy paste the server URL and stream key from the last step and paste them into OBS (Settings → Stream) respective fields. Click on OK.
4. Add a Source & Start Streaming: Now add your video source in the OBS and click on “start streaming”.
Your content now flows to VdoCipher’s servers and becomes accessible to your Flutter app.
Step 3: Stream Live Videos in a Flutter Application Using VdoCipher
Getting Started with Flutter Live Streaming.
To embed a live stream in your Flutter app, use the webview_flutter plugin in combination with JWT (JSON Web Token) for authentication.
Here’s a step-by-step guide to implementing live streaming with VdoCipher.
The Code
Here’s how to set up live streaming in your Flutter app:
import 'package:dart_jsonwebtoken/dart_jsonwebtoken.dart';
import 'package:flutter/material.dart';
import 'package:webview_flutter/webview_flutter.dart';
import 'package:webview_flutter_wkwebview/webview_flutter_wkwebview.dart';

class VdoLiveStream extends StatefulWidget {
const VdoLiveStream({Key? key}) : super(key: key);

@override
State createState() => _VdoLiveStreamState();
}

class _VdoLiveStreamState extends State {
late WebViewController controller;

@override
void initState() {
super.initState();

// Replace with your actual Chat Secret key and liveId from VdoCipher
const chatSecret = 'YOUR_CHAT_SECRET_KEY';
const liveId = 'YOUR_LIVE_ID';

// Create JWT payload for user authentication
final payload = {
'userId': 'uniqueUserId123', // Must be unique for each user
'userInfo': {
'username': 'JohnDoe', // Display name for the user
'avatar': '', // Optional avatar URL
}
};

// Sign the JWT with the chatSecret key
final jwt = JWT(payload);
final token = jwt.sign(SecretKey(chatSecret));

// Configure WebView parameters
late final PlatformWebViewControllerCreationParams params;
if (WebViewPlatform.instance is WebKitWebViewPlatform) {
params = WebKitWebViewControllerCreationParams(
allowsInlineMediaPlayback: true,
mediaTypesRequiringUserAction: const {},
);
} else {
params = const PlatformWebViewControllerCreationParams();
}

// Initialize WebView controller
controller = WebViewController.fromPlatformCreationParams(params)
..setJavaScriptMode(JavaScriptMode.unrestricted)
..setNavigationDelegate(NavigationDelegate(
onPageStarted: (url) => print("Loading URL: $url"),
onPageFinished: (url) => print("Page Loaded: $url"),
onHttpError: (error) => print("HTTP Error: ${error.description}"),
onWebResourceError: (error) => print("Resource Error: ${error.description}"),
))
..loadRequest(Uri.parse(
'<https://player.vdocipher.com/live?liveId=$liveId&token=$token>'));
}

@override
Widget build(BuildContext context) {
return Scaffold(body: WebViewWidget(controller: controller));
}
}
Key Steps:
- Authentication with JWT: A JSON Web Token (JWT) is used for secure user authentication and is only required if the chat feature is enabled in your live stream.
- Embedding the Live Stream: The WebView widget loads the VdoCipher live stream URL, which includes the liveId. If the chat feature is enabled, a token generated using JWT is also appended to the URL.
- Platform-Specific WebView Configuration: The code is compatible with both Android and iOS platforms, ensuring seamless functionality, including inline media playback.
Steps to Implement
1. Install Required Packages
Add the following packages to your pubspec.yaml file:
dependencies: flutter: sdk: flutter webview_flutter: ^4.10.0 webview_flutter_wkwebview: ^3.16.3 dart_jsonwebtoken: ^2.14.2
2. Replace Placeholders Update chatSecret and liveId with the values provided by VdoCipher.
3. Run the App Use flutter run to test the live stream functionality.
Understanding Platform-Specific WebView Parameters
When using WebView in Flutter, media playback is handled differently on iOS and Android. To ensure smooth functionality across platforms, specific configurations may be required based on the target platform.
Here’s how the code addresses these differences:
if (WebViewPlatform.instance is WebKitWebViewPlatform) {
  params = WebKitWebViewControllerCreationParams(
    allowsInlineMediaPlayback: true,
    mediaTypesRequiringUserAction: const {},
  );
} else {
  params = const PlatformWebViewControllerCreationParams();
}
What Does This Code Do?
This snippet checks whether the current platform uses WebKit, the web engine for iOS. If WebKit is detected, specific settings tailored for iOS are applied. Otherwise, it defaults to the standard settings, ensuring compatibility for Android.
1. For iOS (WebKit)
- allowsInlineMediaPlayback: true
This enables videos to play directly within the WebView (inline) instead of switching to fullscreen mode. It’s particularly useful for maintaining the video as part of your app’s interface. - mediaTypesRequiringUserAction: const <PlaybackMediaTypes>{}
By default, iOS requires the user to tap a play button before videos or audio can start. This setting removes that restriction, allowing the video to play automatically.
2. For Other Platforms (like Android)
If the app is running on a platform other than iOS, the code uses the generic PlatformWebViewControllerCreationParams. No additional configurations are applied, as they are not required for other platforms.
Why Do You Need This?
WebView behaves differently on iOS and Android, especially when handling videos:
- On iOS, videos don’t play inline by default and may require user interaction. These parameters address that issue, making the behavior more user-friendly by allowing videos to play automatically within the WebView.
- On Android, these settings aren’t necessary because inline playback and autoplay are already supported by default, without requiring additional configuration.
When Should You Change These?
- If you want videos to always play inline, keep the allowsInlineMediaPlayback setting set to true.
- If you want users to manually tap play, add the required media types to mediaTypesRequiringUserAction.
Secure DRM Video Streaming in Flutter Using the VdoCipher Package
VdoCipher is a platform designed to provide DRM protection and secure video hosting. It enables developers to easily integrate and stream protected video content. To further simplify this process for Flutter developers, VdoCipher offers the vdocipher_flutter package, a tool that allows the integration of DRM-protected video streaming into Flutter applications.
In this blog, we’ll explore:
- Key features of the vdocipher_flutter package.
- How to set it up in a Flutter project.
- Step-by-step instructions to stream DRM-protected videos.
- Best practices for secure and efficient video playback.
Key features of the vdocipher_flutter Package
The vdocipher_flutter package enables developers to securely integrate and stream DRM-protected videos within Flutter applications. It ensures smooth video playback while maintaining content protection in your Flutter app.
Features
- DRM Protection
Streams videos with Widevine and Fairplay DRM, protecting content from screen recording and piracy. - Cross-Platform Support
It works seamlessly on Android, iOS, and the web, providing a consistent experience across all devices. - Secure OTP-Based Authentication
Videos are played using a secure OTP and playbackInfo, ensuring that only authorized users can access the content. - Inbuilt Player UI
The vdocipher_flutter package provides built-in controls for video playback, including play/pause, a seekbar, fullscreen toggle, playback speed, subtitles, and chapters. These controls create a smoother user experience. This ready to use implementation saves time and eliminates the need for custom setup. - Offline Playback
Supports secure video downloads for offline viewing. - Background Playback
Keeps videos playing even when the app is minimized or in the background, and allows controlling media playback through the notification controller. - APIs to Monitor and Control Media Playback
Provides APIs to control media playback, track playback status, and monitor events such as play/pause, current position, seeking, buffering, errors, and more.
How to Set It Up in a Flutter Project
Setting up the vdocipher_flutter package in your Flutter project is simple. Follow these steps to get started:
1. Run this command with Flutter:
$ flutter pub add vdocipher_flutter
2. This will add a line like this to your package’s pubspec.yaml (and run an implicit dart pub get)
dependencies:
  vdocipher_flutter: ^2.7.
3. In android section use Theme.AppCompat theme with MainActivity:
Make this change in android/app/src/main/res/values/styles.xml.
<style name="NormalTheme" parent="Theme.AppCompat.Light.NoActionBar">
     ....
</style>
💡There can be multiple styles.xml files depending on the project structure. Please make the above change in all of them, such as values-night/styles.xml and values/styles.xml.
4. In android section extend the FlutterFragmentActivity class in your MainActivity file:
Make this change in android/app/src/main/java/com/project-name/MainActivity.java.
class MainActivity extends FlutterFragmentActivity {
}
💡Without using Theme.AppCompat theme with MainActivity.java and extending from FlutterFragmentActivity, as mentioned in the 2nd and 3rd steps, our plugin will throw exception. For a better understanding, please take a look at our sample app.
Step-by-Step Instructions to Stream DRM-Protected Videos
Streaming DRM-protected videos using the vdocipher_flutter package requires a few steps. Here’s a complete guide to help you get started:
1. Fetch OTP and Playback Info
• To retrieve the OTP and playbackInfo for a video, you need to call the authenticated API endpoint: https://dev.vdocipher.com/api/videos/{videoID}/otp. For more details on authentication and usage, please refer to the documentation here.
• The API will return the OTP and playbackInfo required to securely stream the video. Example response:
{
  "otp": "your_video_otp",
  "playbackInfo": "your_video_playback_info"
}
2. Create EmbedInfo Object
Once you have the OTP and playbackInfo, you can create an EmbedInfo object to initialize the player. This object includes the OTP, playbackInfo, and additional player options such as resume position, autoplay, caption language, and more. For more details, check the documentation here.
Here’s an example of how to create an EmbedInfo object. Replace the otp and playbackInfo values with the ones you fetched from the API:
const EmbedInfo embedInfo = EmbedInfo.streaming(
  otp: 'your_video_otp',
  playbackInfo: 'your_video_playback_info',
  embedInfoOptions: EmbedInfoOptions(
    preferredCaptionsLanguage: 'en',
    autoplay: true,
  ),
);
3. Add the VdoPlayer Widget
Now, integrate the VdoPlayer widget into your app. Below is a sample implementation that handles various player events, such as errors, fullscreen changes, and picture-in-picture mode changes.
class VdoPlaybackViewState extends State<VdoPlaybackView> {
  VdoPlayerController? _controller;
  VdoPlayerValue? vdoPlayerValue;
  final double aspectRatio = 16 / 9;
  final ValueNotifier<bool> _isFullScreen = ValueNotifier(false);
  Duration? duration;

  @override
  Widget build(BuildContext context) {
    const EmbedInfo embedInfo = EmbedInfo.streaming(
  otp: 'your_video_otp',
  playbackInfo: 'your_video_playback_info',
  embedInfoOptions: EmbedInfoOptions(
    preferredCaptionsLanguage: 'en',
    autoplay: true,
  ),
);
 return Scaffold(
  body: SafeArea(
  child: Column(crossAxisAlignment: CrossAxisAlignment.stretch, children: [
     Stack(
          alignment: Alignment.center,
          children: [
            SizedBox(
              width: _getPlayerWidth(),
              height: _getPlayerHeight(),
              child: VdoPlayer(
                embedInfo: embedInfo,
                aspectRatio: aspectRatio,
                onError: _onVdoError,
                onFullscreenChange: _onFullscreenChange,
                onPlayerCreated: _onPlayerCreated,
                onPictureInPictureModeChanged: _onPictureInPictureModeChanged,
              ),
            ),
          ],
        ),
      ]),
    ));
  }
  _onVdoError(VdoError vdoError) {
    if (kDebugMode) {
      print("Oops, the system encountered a problem: ${vdoError.message}");
    }
  }

  _onPlayerCreated(VdoPlayerController? controller) {
    setState(() {
      _controller = controller;
      _onEventChange(_controller);
    });
  }

  _onPictureInPictureModeChanged(bool isInPictureInPictureMode) {
    // Handle picture-in-picture mode changes
  }

  _onEventChange(VdoPlayerController? controller) {
    controller?.addListener(() {
      setState(() {
        vdoPlayerValue = controller.value;  // Update player state
      });
    });
  }

  _onFullscreenChange(bool isFullscreen) {
    setState(() {
      _isFullScreen.value = isFullscreen;  // Update full-screen state
    });
  }

  _getPlayerWidth() {
    return MediaQuery.of(context).size.width;  // Set player width
  }

  _getPlayerHeight() {
    return _isFullScreen.value
            ? MediaQuery.of(context).size.height  // Adjust height for full-screen
            : _getHeightForWidth(MediaQuery.of(context).size.width);  // Maintain aspect ratio
  }

  double _getHeightForWidth(double width) {
    return width / aspectRatio;  // Maintain aspect ratio
  }
}
Explanation of Functions:
- _onVdoError: This function is triggered when there’s an error in the video player. It logs the error message to the console during development.
- _onPlayerCreated: Called when the player is successfully created. The player controller is saved and linked to player state changes.
- _onPictureInPictureModeChanged: This function gets triggered when the picture-in-picture mode is toggled. You can implement logic for handling this mode here.
- _onEventChange: Listens for changes in the player state (e.g., playback progress, buffering).
- _onFullscreenChange: This function updates the full screen mode state and ensures the layout is adjusted accordingly.
- _getPlayerWidth: Determines the width of the player, adjusting it based on whether the platform is web or mobile.
- _getPlayerHeight: Adjusts the height of the player depending on whether full-screen mode is active. If not, it uses the aspect ratio to calculate the correct height.
- _getHeightForWidth: Calculates the height of the player based on the provided width, maintaining the aspect ratio (16:9 in this case).
4. Handle Player Events
To listen for playback events and update the player’s state, you can add a listener to the VdoPlayerController. The following code snippet demonstrates how to track the player’s state and capture changes:
_onEventChange(VdoPlayerController? controller) {
  controller!.addListener(() {
    VdoPlayerValue value = controller.value;
    setState(() {
      vdoPlayerValue = value;
    });
  });
}
This listener listens to changes in the VdoPlayerController and updates the state of your widget with the latest VdoPlayerValue. The VdoPlayerValue class contains various properties that describe the current state of the player.
Key Properties of VdoPlayerValue
The VdoPlayerValue class provides essential information about the player’s state. Below are the properties you can monitor:
- bufferedPosition → Duration
Represents the position up to where the video has been buffered. It indicates how much of the video is available for playback without interruptions. - duration → Duration
The total duration of the video, from start to finish. - isAdaptive → bool
Indicates whether track selection is done in adaptive mode (true) or if a specific track has been selected explicitly (false). - isBuffering → bool
True if the video is currently buffering, meaning data is being loaded before playback can continue. - isEnded → bool
True if the currently loaded video has reached its end and playback is complete. - isLoading → bool
True if a video is currently being loaded into the player, meaning data for playback is being fetched. - isMuted → bool
Specifies whether the audio output of the video is muted. This is supported only on the web and is always false for Android and iOS platforms. - isPlaying → bool
True if the video is currently playing, or false if it is paused. - mediaInfo → MediaInfo?
Provides details related to the currently loaded video, such as metadata or additional information. - playbackSpeed → double
Represents the current playback speed of the video. A value of 1.0 typically indicates normal speed. - playbackSpeedOptions → List<double>
A list of available playback speed options that the user can select from during playback. - position → Duration
The current playback position of the video, indicating where the video is currently being played from. - resizeMode → ResizeMode
Specifies how the video should be resized to fit within the player, such as stretching, scaling, or fitting the aspect ratio. - skipDuration → Duration
The duration for skipping backward or forward in the video, allowing users to jump a specific amount of time in the playback. - subtitleTrack → SubtitleTrack?
Represents the currently selected subtitle track. Returns null if subtitles are disabled. - subtitleTracks → List<SubtitleTrack>
A list of all available subtitle tracks for the video, allowing users to select between them if needed. - vdoError → VdoError?
Provides details about any error encountered during video loading or playback. If null, no error has occurred. - videoTrack → VideoTrack?
The currently selected video track. This may refer to the video quality or resolution. - videoTracks → List<VideoTrack>
A list of all available video tracks, allowing the user to choose among different video qualities or resolutions. - volume → double?
Specifies the current volume level of the audio/video, represented as a value between 0.0 (muted) and 1.0 (maximum volume). This is supported only on the web and is always null for Android and iOS platforms.
For instance, to check if the video is playing and update the UI accordingly, you can use:
if (vdoPlayerValue.isPlaying) {
  // Update UI to show that the video is playing
} else {
  // Show the pause or stopped state
}
Handling Player State Changes
You can use the properties from VdoPlayerValue to implement dynamic behavior based on the playback state:
- Buffering Handling: Use isBuffering to show a loading spinner while the video is buffering.
- Tracking Progress: Use position and duration to show a real time progress bar to the user.
- Playback Speed: You can adjust playback speed by using the playbackSpeed property and providing speed options using playbackSpeedOptions.
- Error Handling: If a playback error occurs, vdoError will provide the error details, which can be displayed to the user.
Here’s how you can react to these events:
if (vdoPlayerValue.isBuffering) {
  print("Buffering...");
} else {
  print("Buffering complete.");
}
if (vdoPlayerValue.isEnded) {
  print("Playback ended.");
}
if (vdoPlayerValue.vdoError != null) {
  print("Error: ${vdoPlayerValue.vdoError?.message}");
}

5. Offline download and Playback
The VdoCipher Flutter package offers the capability to download videos to local storage for offline playback on Android devices running Lollipop (API level 21) and above.
It includes APIs to:
• Fetch available download options for a video in your dashboard
• Download media assets to local storage
• Track download progress
• Manage downloads (query, stop, resume or delete downloads)
For detailed instructions, refer to the complete documentation.
6. Background playback (Android Only)
Background playback allows the media to continue playing seamlessly while multitasking or switching apps. Starting from version 2.7.0, the vdocipher_flutter package supports uninterrupted playback, even when the screen is locked or the app is exited.
The vdocipher_flutter package offers three playback modes, each providing a different level of persistence:
• Default Mode: The media will immediately pause when the user closes or navigates away from the player screen.
• Continue playback on back press: Playback pauses when the app is completely exited, but continues if the app is minimized or the back button is pressed.
• Continue playback on app exit: The media continues playing in the background, regardless of whether the app is minimized or fully exited.
For a more detailed understanding on different playback modes and how to implement them, refer to the complete documentation.
Secure Your Content ✅
Protect Your Videos from Unauthorised Downloads & Screen Capture with VdoCipher’s Flutter SDK
Conclusion
Building a Flutter live streaming app with VdoCipher gives you a secure, flexible, and feature-rich platform. From setting up DVR and live chat to embedding DRM-protected content with a user-friendly interface, VdoCipher empowers developers to deliver high-quality, engaging live experiences.
With the steps outlined above, you can confidently create a smooth, interactive, and secure live streaming solution that meets the demands of today’s audiences.
Ready to Get Started?
Use ZenStream by VdoCipher to set up your Flutter environment, and start streaming confidently. Your users will appreciate the secure, high-quality, and interactive video experience you provide.
FAQs Around Flutter Live Streaming
1. How do I start a live stream using VdoCipher in my Flutter app?
You’ll need to create a live stream via the VdoCipher dashboard, obtain the credentials, and then integrate them with your Flutter WebView to start streaming.
2. Can I enable DVR features, like pausing and rewinding, during a live stream?
Yes. By integrating DVR, viewers can pause, rewind, and replay live sessions without missing any content.
3. How do I set up and secure live chat within the stream?
You can enable chat modes directly from VdoCipher’s dashboard, and use JWT authentication tokens to ensure only authorized users participate.
4. What steps can I take to ensure low latency and smooth playback on multiple devices?
Follow the recommended encoder settings, use adaptive bitrate streaming, and configure your Flutter WebView for optimal platform-specific playback settings.
Supercharge Your Business with Videos
At VdoCipher we maintain the strongest content protection for videos. We also deliver the best viewer experience with brand friendly customisations. We'd love to hear from you, and help boost your video streaming business.

Nafis is a skilled Android developer with a passion for building intuitive and high-performance mobile applications


Leave a Reply