
Docs for Live streaming
- One to many broadcast live
- Works on Website and Mobile Apps
- Chat function with and without authentication
The setup requires initiating a live stream from the vdocipher dashboard and setting up a streaming software like OBS with appropriate settings + connecting it to VdoCipher.
Get Started with LiveStream Broadcasting
1. Install OBS Studio or any popular streaming software or Zoom
You can use any broadcasting app which can input a stream URL and stream key. We recommend OBS Studio. It is a free and open-source, cross-platform screencasting and streaming app. It is the most popular software in its category and generally recommended for live streaming. It is available for Windows, macOS and Linux. OBS Studio is not affiliated with VdoCipher.- OBS Studio home page
- Quick start guide by OBS
- Troubleshooting guides for OBS issues or
- Connect with Zoom as streaming software.
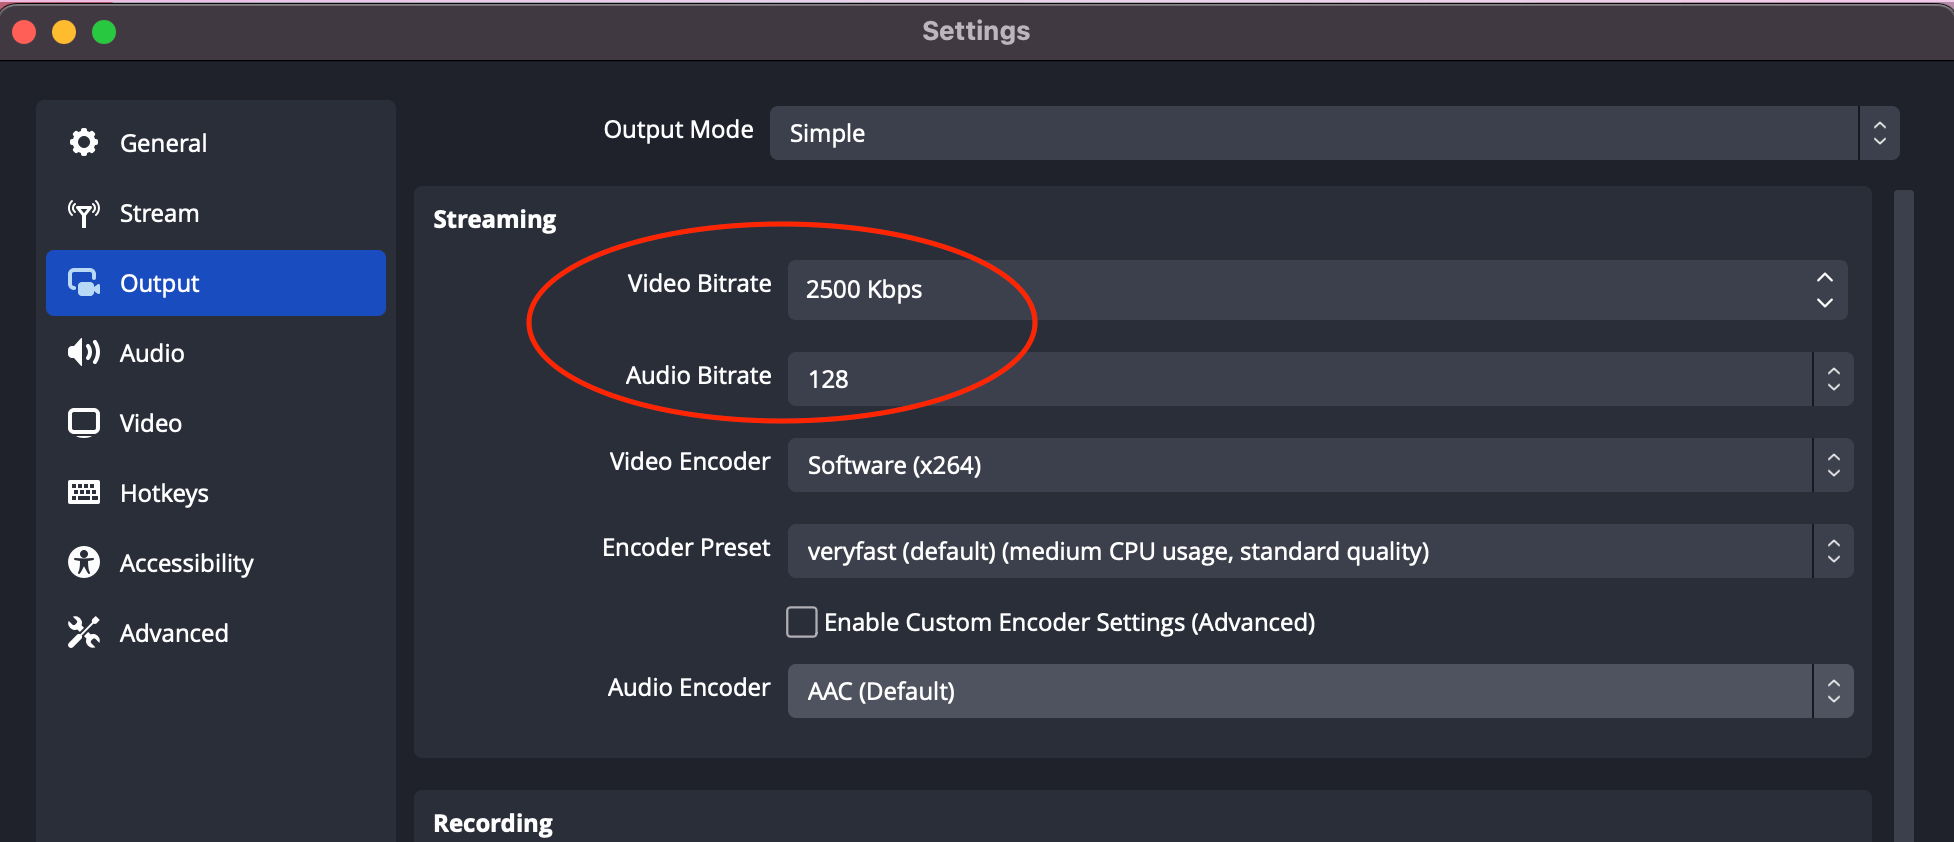
2. Change OBS Studio Setting for Streaming
- Click on “Settings” button, and then go to “Output” section. Some settings will look different on Mac vs Windows. But key settings are same in both the systems.
- Choose “Video Bitrate” as 2500 kbps for lecture/webinar/course content, if you have other form of content like events/sports/movies, then you can also choose higher bitrates upto 7000 kbps. But for lecture content, 2500 kbps should be quite good and we recommend it.
- Choose “Audio Bitrate” as 128.
- Please keep the encoder preset and other settings to default settings. Setting → Output
 Go to “Video” section and ensure that “Common FPS Values” is 30. You can use 720 p or 1080 p resolution as it suits you.
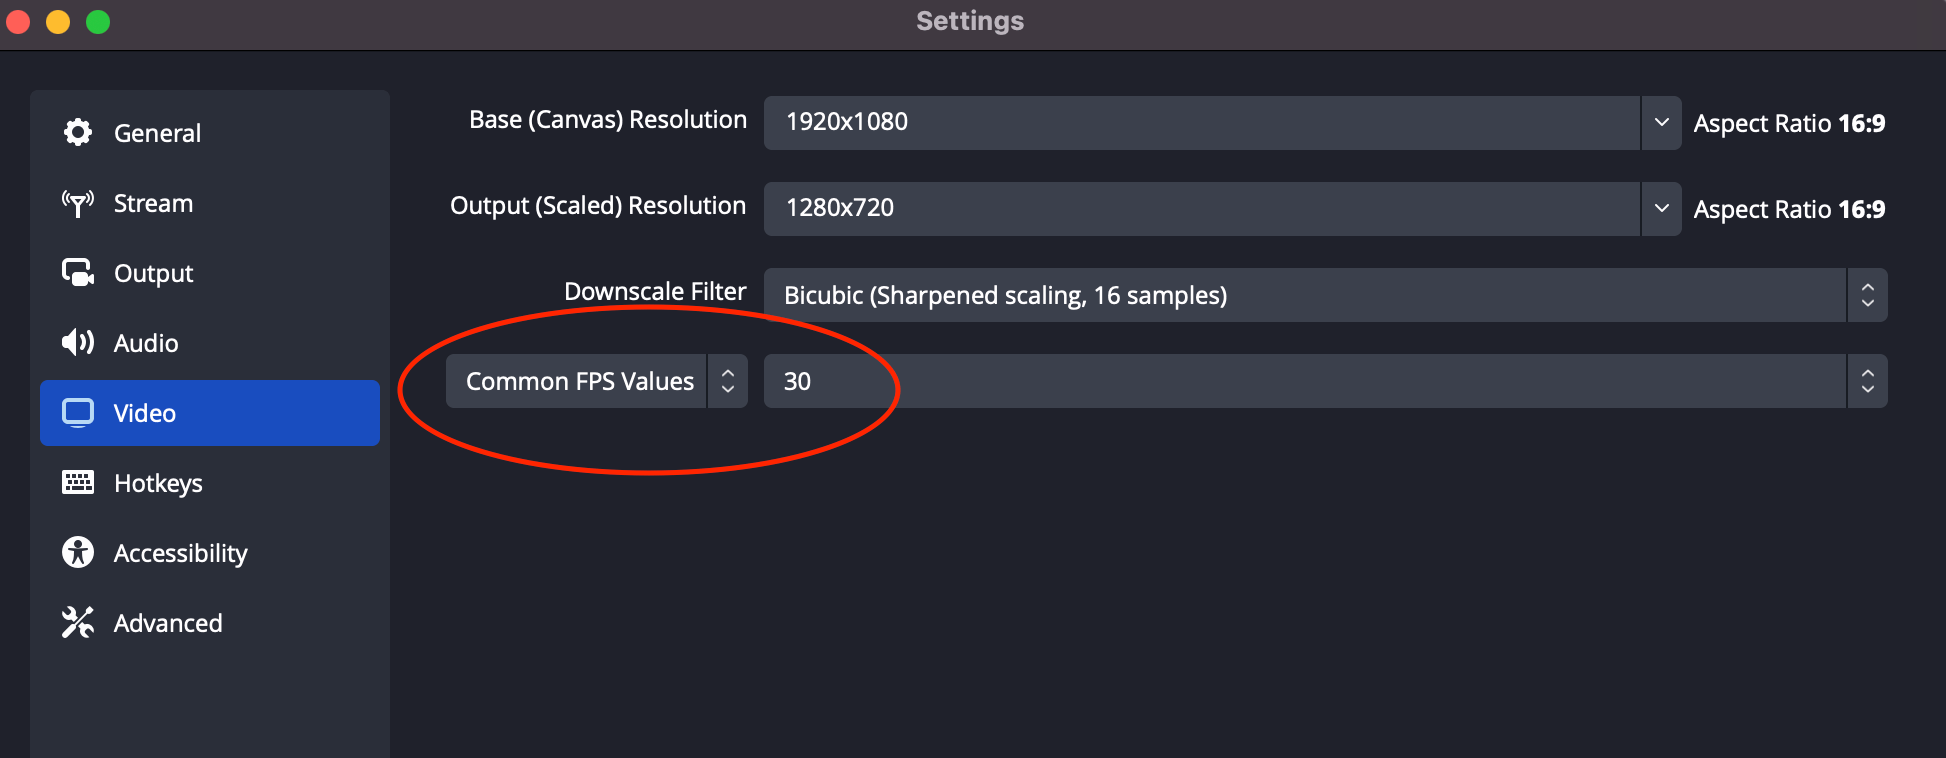
3. Go to “LiveStream” section from dashboard left panel.
Then click on “New Live Stream” button in Vdocipher dashboard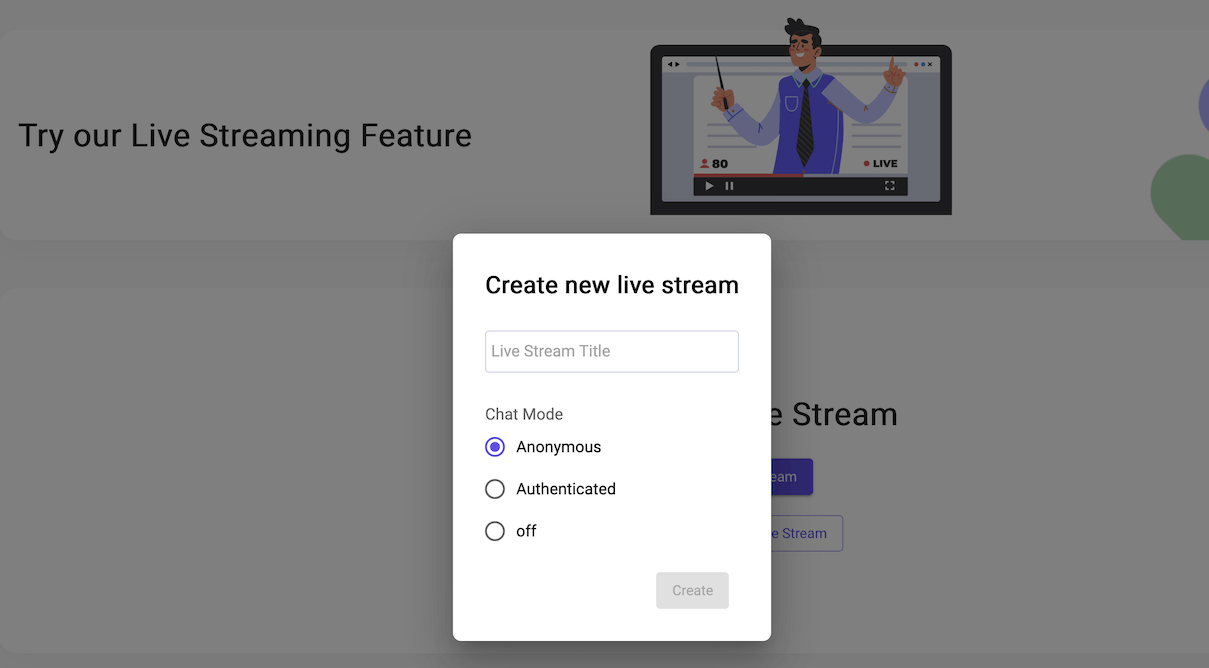
4. Enter the title and chat mode.
- Anonymous/Non-authenticated Chat: Allow anyone to join in the chats and set their own name
- Authenticated Chat: Allow only viewers who have generated the tokens via logging into your platform, you can keep same user name as on your platform.
- Off : There will be no Chat Option.
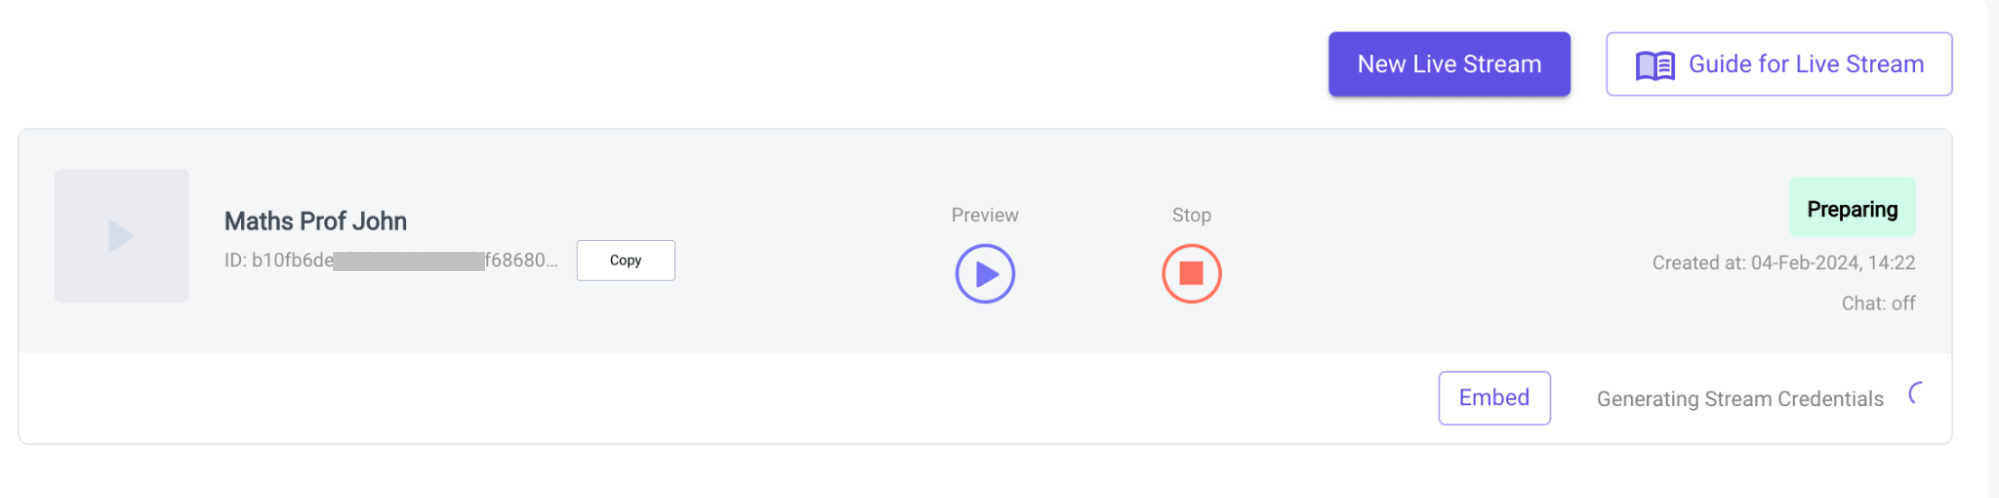
5. Wait until status changes to “Ready to Start Broadcasting”
Initiating a stream takes upto 90 seconds and it will show status as “preparing” for that duration.
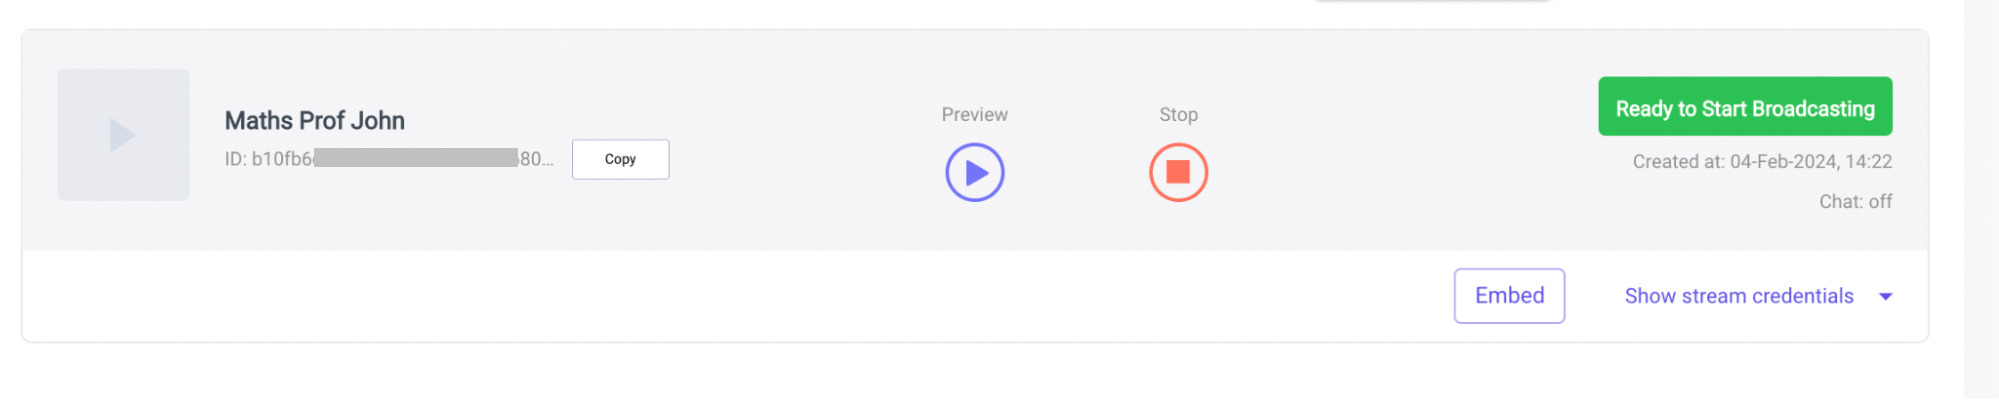
Once the live stream gets ready for connection, it will show “Ready to Start Broadcasting”. Input pricing for the stream starts from this time.
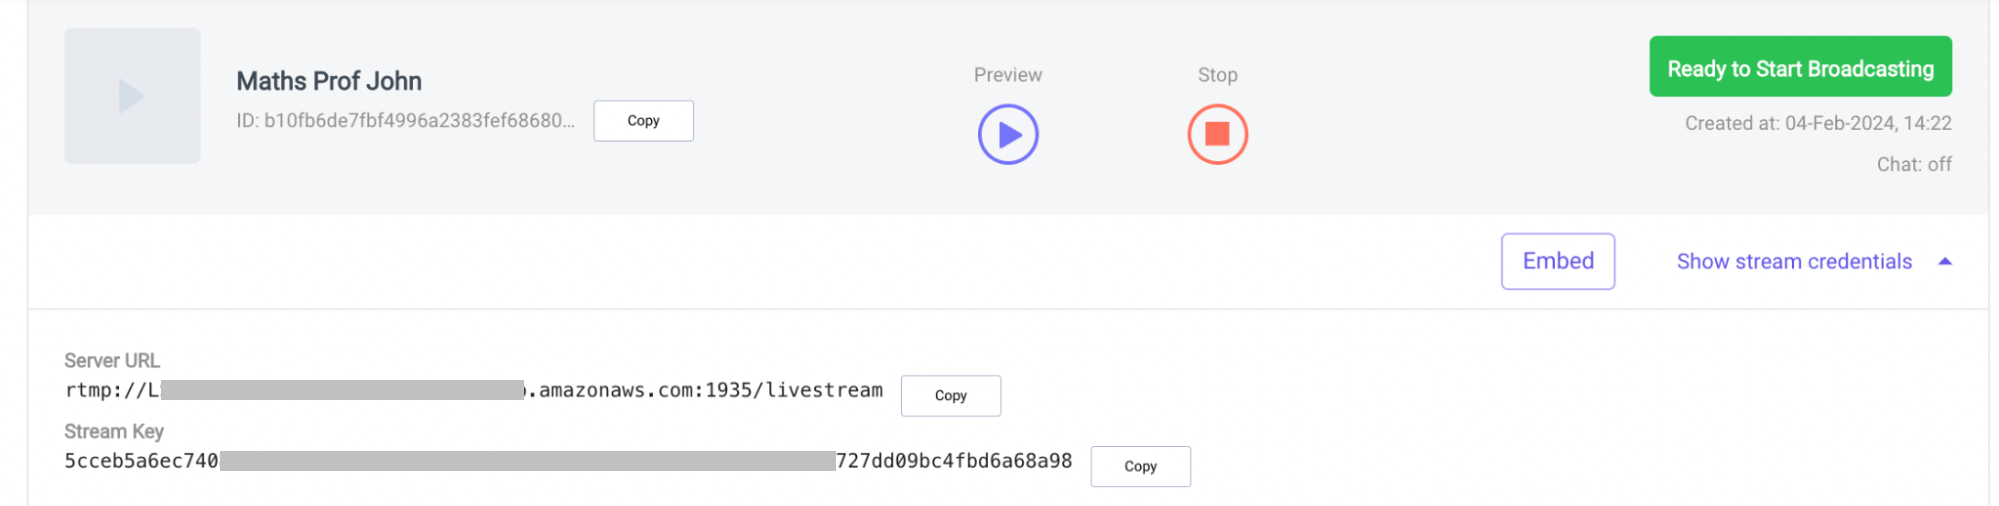
Click on “Show Stream Credentials”, you will see “Server URL” and “Stream Key” here. We set up dedicated infrastructure for each stream.
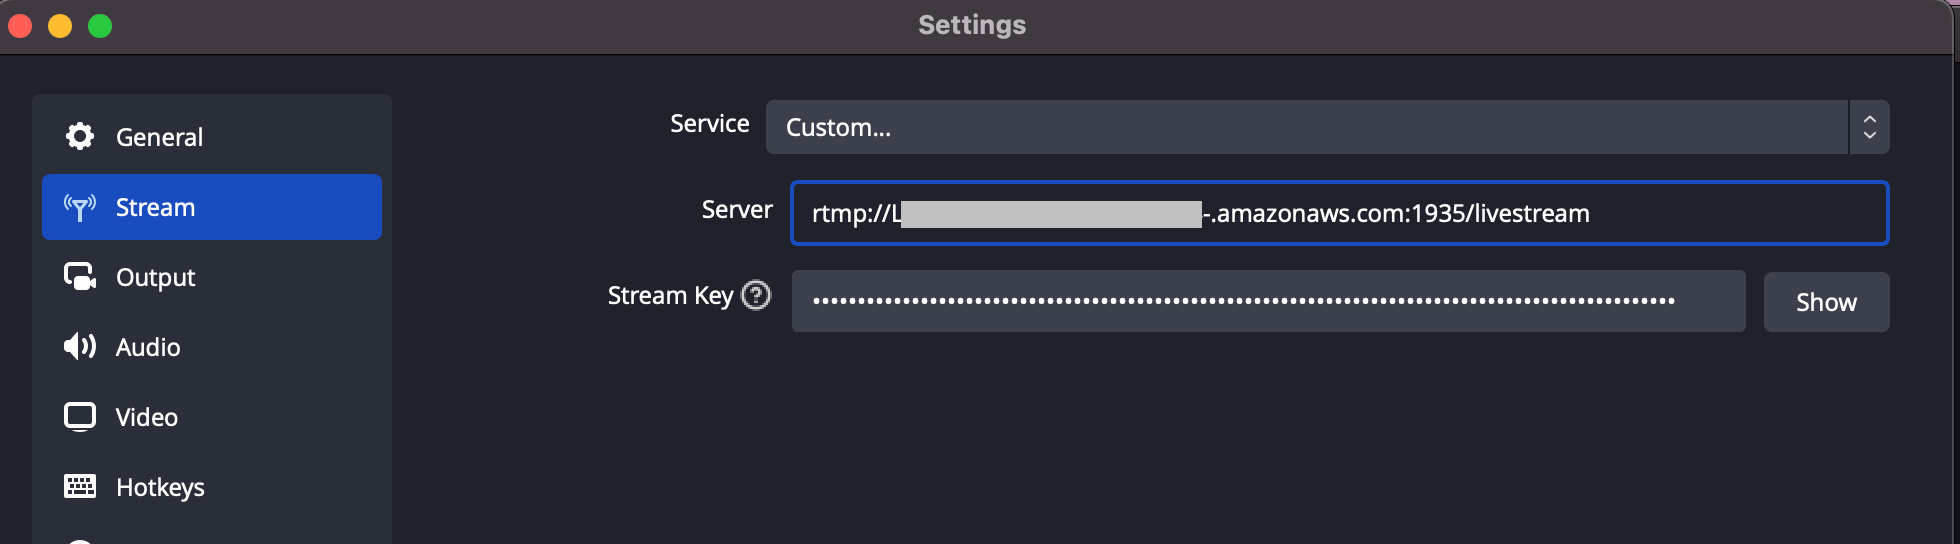
6. Now Go to OBS in Settings → Stream section
Copy paste the server url and stream key from the last step and enter here in respective fields. Click on OK.
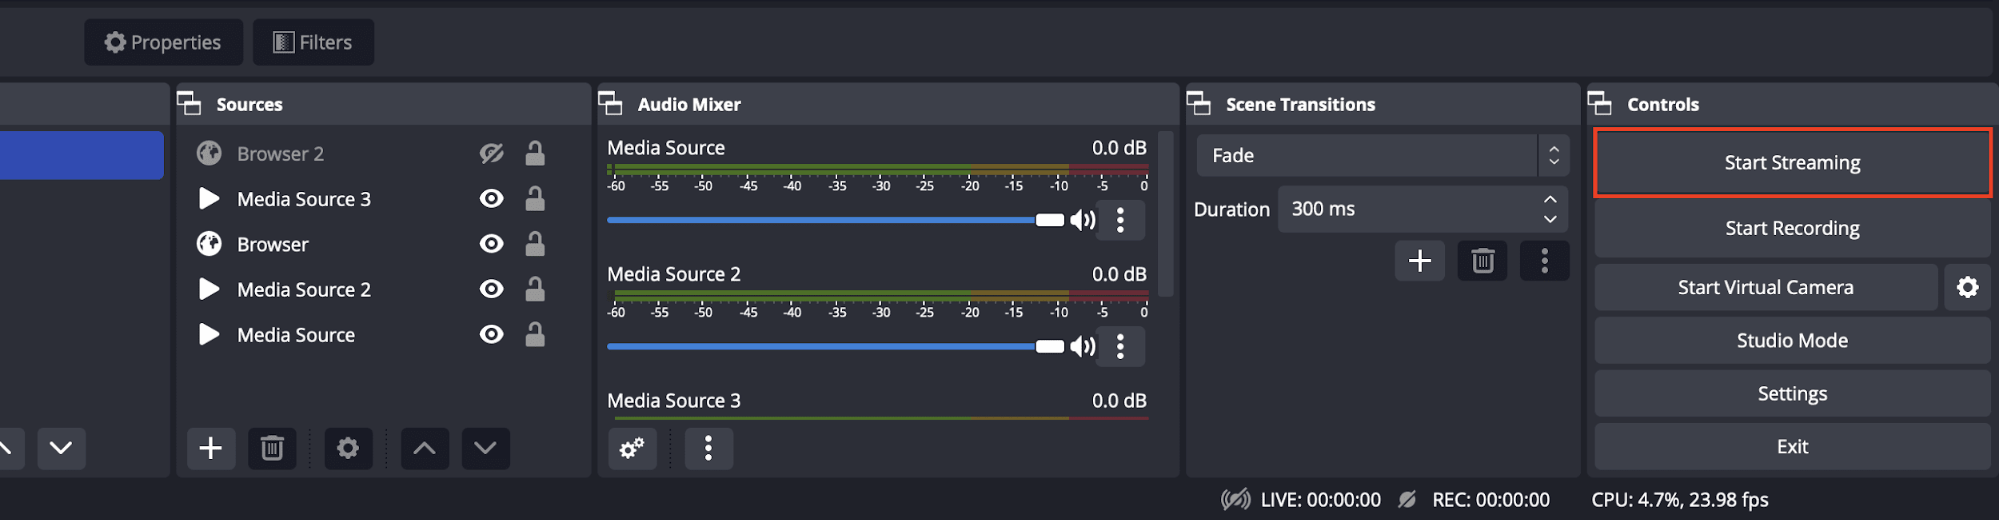
7. Add Source in OBS
Click on + in Sources → Video Capture Devices/Audio Capture Devices/ MediaSource. You can also add multiple sources here, please refer to OBS guide on all source possibilities e.g external camera/screen share/webcam etc.

8. Click on “Start Streaming”.
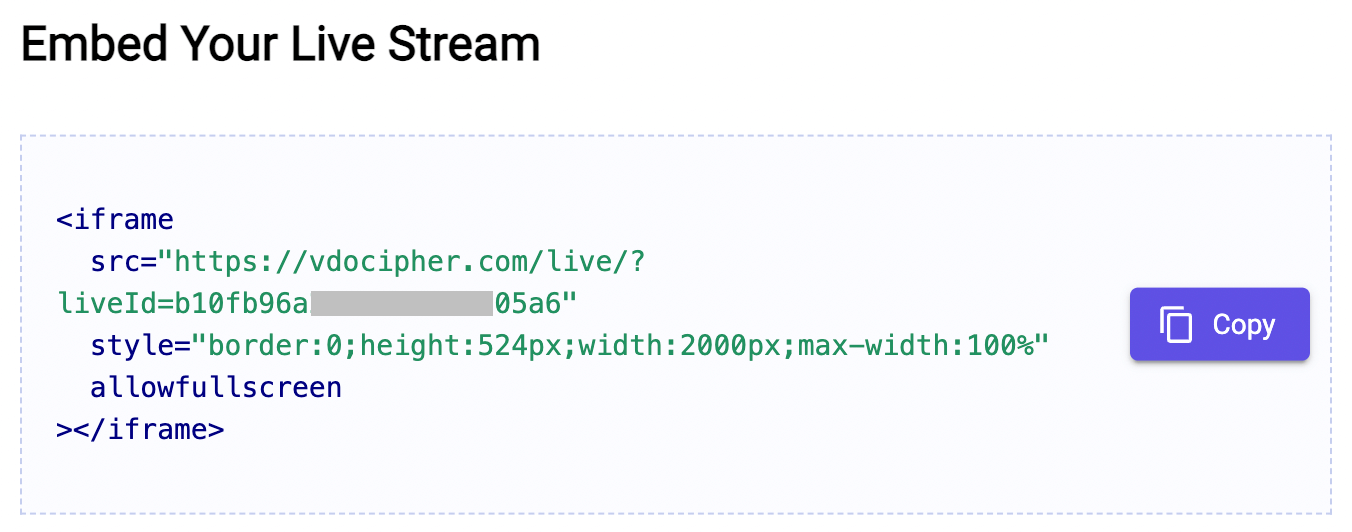
9. Generate embed code
Click on “embed” button below any stream in dashboard and you will get the embed code to be used in website or app.
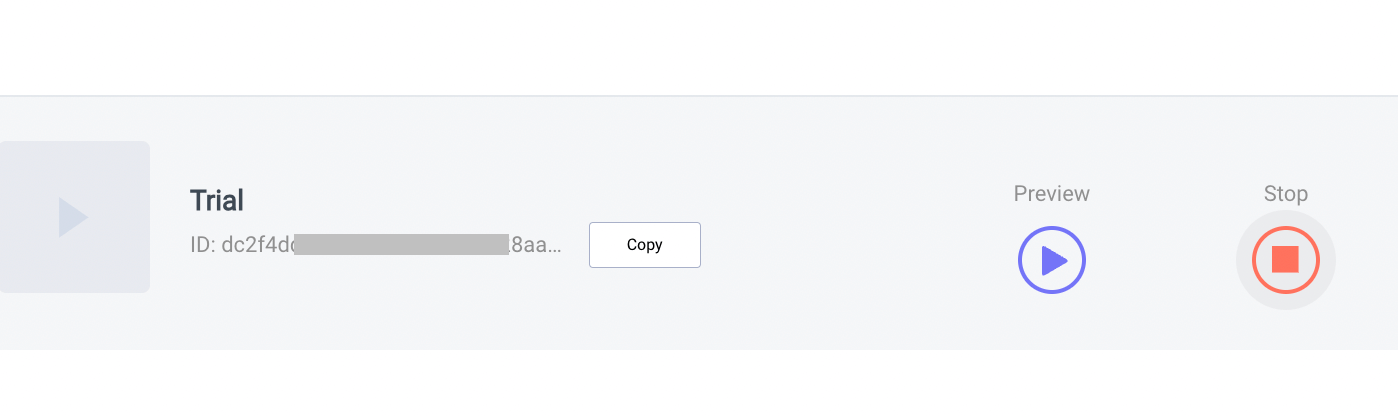
10. Click to view as a moderator.
Now you can test the stream and also chat with all the viewers if chat functionality was ON. The player will have multiple quality options and is adaptive in nature (switches automatically based on viewer internet speed).
Note: It is recommended to not stream the video on same device from where obs/streaming software is being connected as it may cause data/memory issues. Best to test the stream and chat in a different device.
11. Stop/End Stream & Recorded File
Temporary pausing live stream from streaming software/obs - If you disconnect only from OBS by ending stream in obs , then the stream will stay open and player will show a message “Stream paused from host. Please wait for sometime”. You can again start the stream from obs and player will automatically restart the stream.
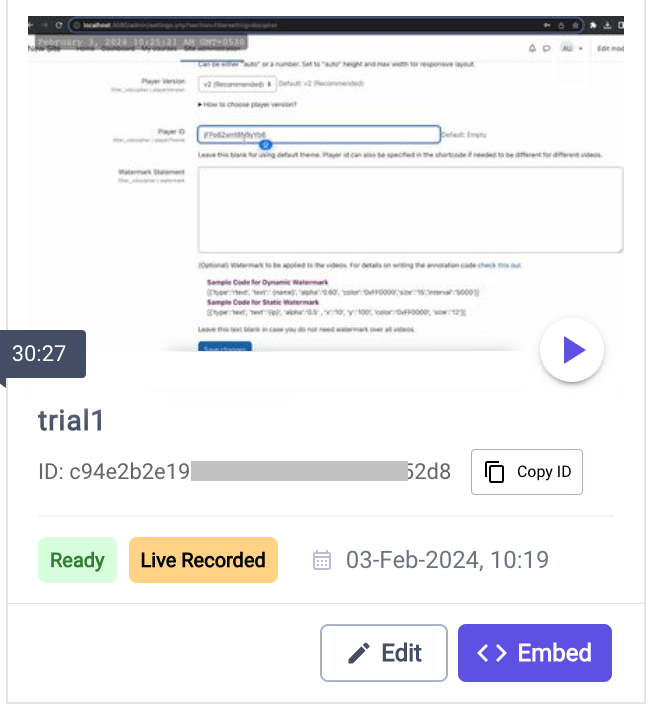
Permanent end of streaming - If you click on “stop” button in vdocipher dashboard , then the stream will end and player will show the message -”Live has ended”. Now the same stream can not be restarted and you need to generate a new stream, if you want to stream again. After the stream ends, vdocipher will process the recorded DRM file for the live stream; it will process & get ready in the vdocipher dashboard after some time. (Anywhere from 1 to 4 hours). The recorded video will have the tag “Live recorded”.
Note: If there is no stream connected from a streaming software to vdocipher live stream for 3 hours, then stream will auto end.
Generate Chat Token for Authenticated Chat
NOTE: Chat Secret is unique for each LiveStream which have been authenticated.
JavaScript
const payload = {
  userId: '', // must be unique
  userInfo: {
    username: '', // username shown in chat
    avatar: '', // avatar shown in chat
  }
};
GENERATED_JWT_TOKEN = jwt.sign(payload, chatSecret);
Python
import jwt
payload = {
    "userId": "",  # must be unique
    "userInfo": {
        "username": "",  # username showed in chat
        "avatar": "",    # avatar showed in chat
    }
}
generated_jwt_token = jwt.encode(payload, chatSecret, algorithm="HS256")
Java
import io.jsonwebtoken.Jwts;
import io.jsonwebtoken.SignatureAlgorithm;

String userId = ""; // must be unique
String username = ""; // username showed in chat
String avatar = ""; // avatar showed in chat
String chatSecret = "yourSecretKey";

String generatedJwtToken = Jwts.builder()
        .claim("userId", userId)
        .claim("userInfo", new UserInfo(username, avatar))
        .signWith(SignatureAlgorithm.HS256, chatSecret)
        .compact();
Ruby
require 'jwt'
payload = {
  userId: '', # must be unique
  userInfo: {
    username: '', # username showed in chat
    avatar: '', # avatar showed in chat
  }
}
chat_secret = 'yourSecretKey'

generated_jwt_token = JWT.encode(payload, chat_secret, 'HS256')
Understand EMBED CODE
You can use Vdocipher player url to share the link to viewers OR Add this embed code for Viewers:
In case of authenticated chat Mode, add the generated token.
<iframe
  src="https://player.vdocipher.com/live/?liveId={STREAM_ID}&token={GENERATED_JWT_TOKEN}"
    style="border:0;width:720px;height:405px"
    allowfullscreen
></iframe>
If the chat mode is anonymous / off, Just pass the streamId.
<iframe
  src="https://player.vdocipher.com/live/?liveId={STREAM_ID}"
    style="border:0;width:720px;height:405px"
    allowfullscreen
></iframe>